Picture Roller Blinds: How it Works
Our custom photo blinds look amazing and really add a touch of elegance to the home. To get the best results and ensure your custom roller blinds are designed and installed to perfection, follow our instructions and read our Safety & Fitting guide. Please also read our Safety Cord Control information below for how to safely use your custom blinds. If all care and installation instructions are followed correctly, custom shades have a 3-year guarantee on print, material & mechanism. Below we list out the steps you should follow when ordering your custom-made blinds.
Step 1: Measure your window/frame
Measuring the dimensions is crucial to a successful custom roller blind installation. First, you need to decide how you want to mount your roller blinds - see the options below. Once you've decided, you then need to input the width and height dimensions as specified for each mounting style. Relief: add 1.96" (5cm) to the width. Recess: provide the exact dimensions. Input these figures into the design tool to start creating your own blinds.
Relief mount photo blinds
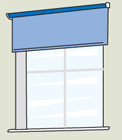
This is where the picture window blind screws to the window frame or wall and stands proud of the wall or frame. You must add at least 1.96" in width to house the spindle fittings as well as the personalized blind.
Recess mount photo blinds
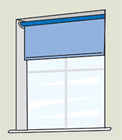
The custom roller blind goes inside the 'box' of the window. We need to know the precise dimensions. We subtract 1.25" from the fabric width to allow for brackets. The finished custom made blind including brackets will equal your selected width.
Step 2: Choose the material for your indoor blinds
We have 2 fabrics for our personalized roller blinds, both providing a completely different look, feel and even purpose. Our stiff translucent is decorative, textured and lets some light shine through without being transparent at all. These are perfect for conservatories when you want the hue of the sunshine but without it glaring into your face. You cannot see through stiff translucent, but some light shines through. Our Blackout fabric does what it says - blocks out all the light, making them the ideal custom blinds for babies' nurseries, bedrooms, and even cinema rooms. This material also has waterproof qualities so they work well in bathrooms and as kitchen roller blinds.
Step 3: Choose the cord options for your custom window blinds
You really do get to customize every aspect of your bespoke roller blinds. For the cord, first, choose which side you'd like it on. This could depend on whether you're right or left handed, or where the blinds are to be fitted and which side has the easiest access. Secondly, choose your cord style. It comes as standard in white plastic, or for an extra cost, give your custom blinds a stylish silver metallic cord.
Step 4: Upload your photos
Now it's the fun part - designing your custom blinds. You can choose a single image, background colors, text overlays or create a photo collage using your favorite family snaps. Simply select more than 1 photo, choose your preferred style from our ready-made collages or move the images yourself for a custom made collage.
Step 5: Double check your design
Use our zoom and preview functionality to double check your design and ensure it's exactly the way you want it. Whilst we will contact you regarding low-quality images, any spellings or positioning of images is not up to us to rectify should there be an error. So, do make sure you have thoroughly checked the design of your indoor blinds before paying.
Note: When producing your custom roller shades, we add 2-3 wraps of extra fabric at the top of your image. We mirror your design in most cases, so when the printed roller shade is fully extended the metal pole is not exposed. Make sure you do not extend the picture roller blind past the lower limit of your window as this may cause the fabric to fall off in years to come. If you select blackout material, the reverse of your custom blinds is black in color.
Safety Cord Control Mechanism
All custom printed window shades with pictures have a cord control that can give rise to safety concerns with children. Please keep the cord out of reach of children by fitting and using the cord clip supplied.
How to attach the cord clip: Take each part of the clear plastic clip and line up the last 'ball' on the ends of the cord string. Press the 'ball' into the holes so you hear a 'click'. To fix the 2 ends together, slot the 2 clips into one another as if you were making a full square. (Push it against your finger for support.) You should hear a clear 'snap'.
How it works: If a child, or anyone, pulls too hard on the cord, the clip will come apart. This is to protect children who can accidentally get cords wrapped around their neck. To avoid this happening when you open or shut your custom printed window blinds, pull the cord gently, guiding it along with your hands.
Child Safety For All Fitted Blinds
See below for the child safety regulations in regards to custom roller blind cords. For extra precaution, even with a safety device in place, we recommend that you move furniture such as cots, beds, side chairs away from windows fitted with a roller blind that has a side cord control mechanism.
Child Safety Regulations mean that all custom printed blinds have to comply with EN13120. Contrado Imaging Ltd takes the following measures to comply:
- A safety breaker piece will be supplied, with any custom window blind with cords and/or chains.
- We advise the recommended distance from the floor to the bottom of the chain will be at least 31.5".
- We supply the cord length at 2/3rds the length of your chosen drop.
- A warning notice comes attached to your roller blind.
- Installation instructions will be provided and must be available once the custom roller shades has been fitted.
- There will be a warning notice on the product packaging.
- Our company name and date of manufacture are included on the roller blind fabric.
These safety measures will be applied to every custom window blind supplied by Contrado Imaging Ltd.
Roller blinds max print dims
Stiff translucent: up to 53 x 118 / 118 x 53 inch
Blackout: up to 53 x 197 / 197 x 53 inch
Fire Retardant Roller Blind Fabric
Please note: Both fabrics are fire retardant, and safe for use in homes.
Please note: The total thickness of your photo blind, once fully rolled (including the pole) is between 2.16" - 2.36". We advise to check the measurements of your window frame, and the distance between the frame and the ceiling, to ensure the window opens properly, without the blinds obstructing them.
Please note: We will add a few rolls to the top of your custom window blind by mirroring your image, ensuring that the colors match up. This will stop the pole being displayed when your custom printed roller shade is fully down. Ensure that you keep this part rolled around the custom made blind, as it adds strength. This bit will not show in the design interface - we'll take care of it!



 This is where the picture window blind screws to the window frame or wall and stands proud of the wall or frame. You must add at least 1.96" in width to house the spindle fittings as well as the personalized blind.